Additional Images

New OEM '90 - '05 5 speed Shifter Full Maintenance Kit
23790515
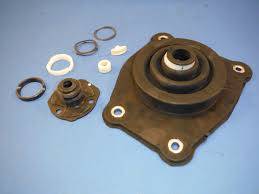
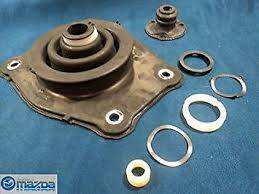
New Mazda OEM '90 - '05 5 speed Shifter Full Maintenance Kit. One of the Miata's most common problems are a sloppy shifter. Replacing the Nylon shifter bushing(s) will make a world of difference in your shifting pleasure. When your shifter needs bushings, it usually needs all new boots also and it's best to replace all the other shifter parts while you have everything apart. The shifter boot insulator seals off the drivers compartment from dirt, noise and moisture. The trans seal seals out the transmission shifter turret from dirt and moisture and the nylon shifter bushing(s) is the item that causes the sloppy shifting issues You will love the difference after you install these parts.
Our FULL Rebuild Kit Includes:
OEM Mazda wave washers and (2) nylon change bushings
OEM Mazda nylon shifter bushing
OEM Mazda Nylon shifter bushing (for '90 - '97 only)
OEM Mazda lower shift boot from 06+ MX-5 (is superior and fits all Miata's)
OEM Mazda Upper Shift Boot insulator
The kit is designed to fit both the NA trans/shifter and the NB. Black bushing and tab'd wavy washer goes into the trans and white bushing with wave washer goes on the shifter
Our kit uses Genuine OEM Mazda components with an option to upgrade to a Racing Bronze Shifter Bushing for that firmer feel shift.
Please see generic assembly instructions below in the description.
Pricing:
$100.69
Description
Treasure Coast Miata Shifter Rebuild Kit installation
Remove the screws holding the center console in place and remove console from he car.
After you unscrew the four bolts holding down the large boot, you will probably have to pry it up. Remove it completely to better expose the three bolts holding down the small boot below.
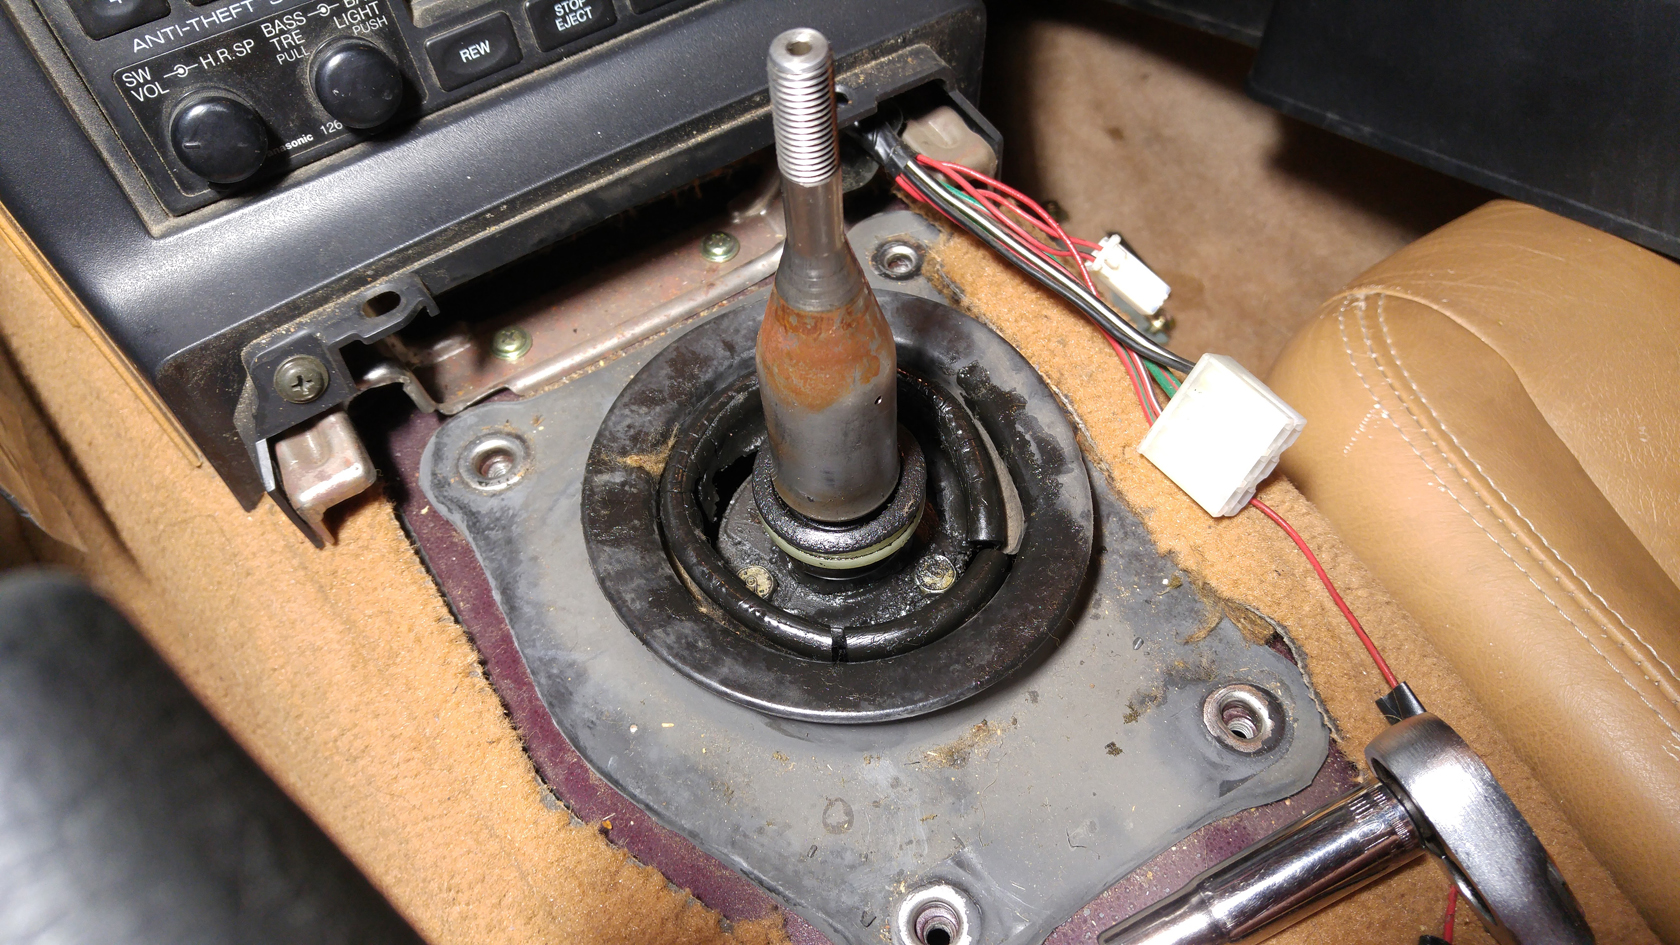
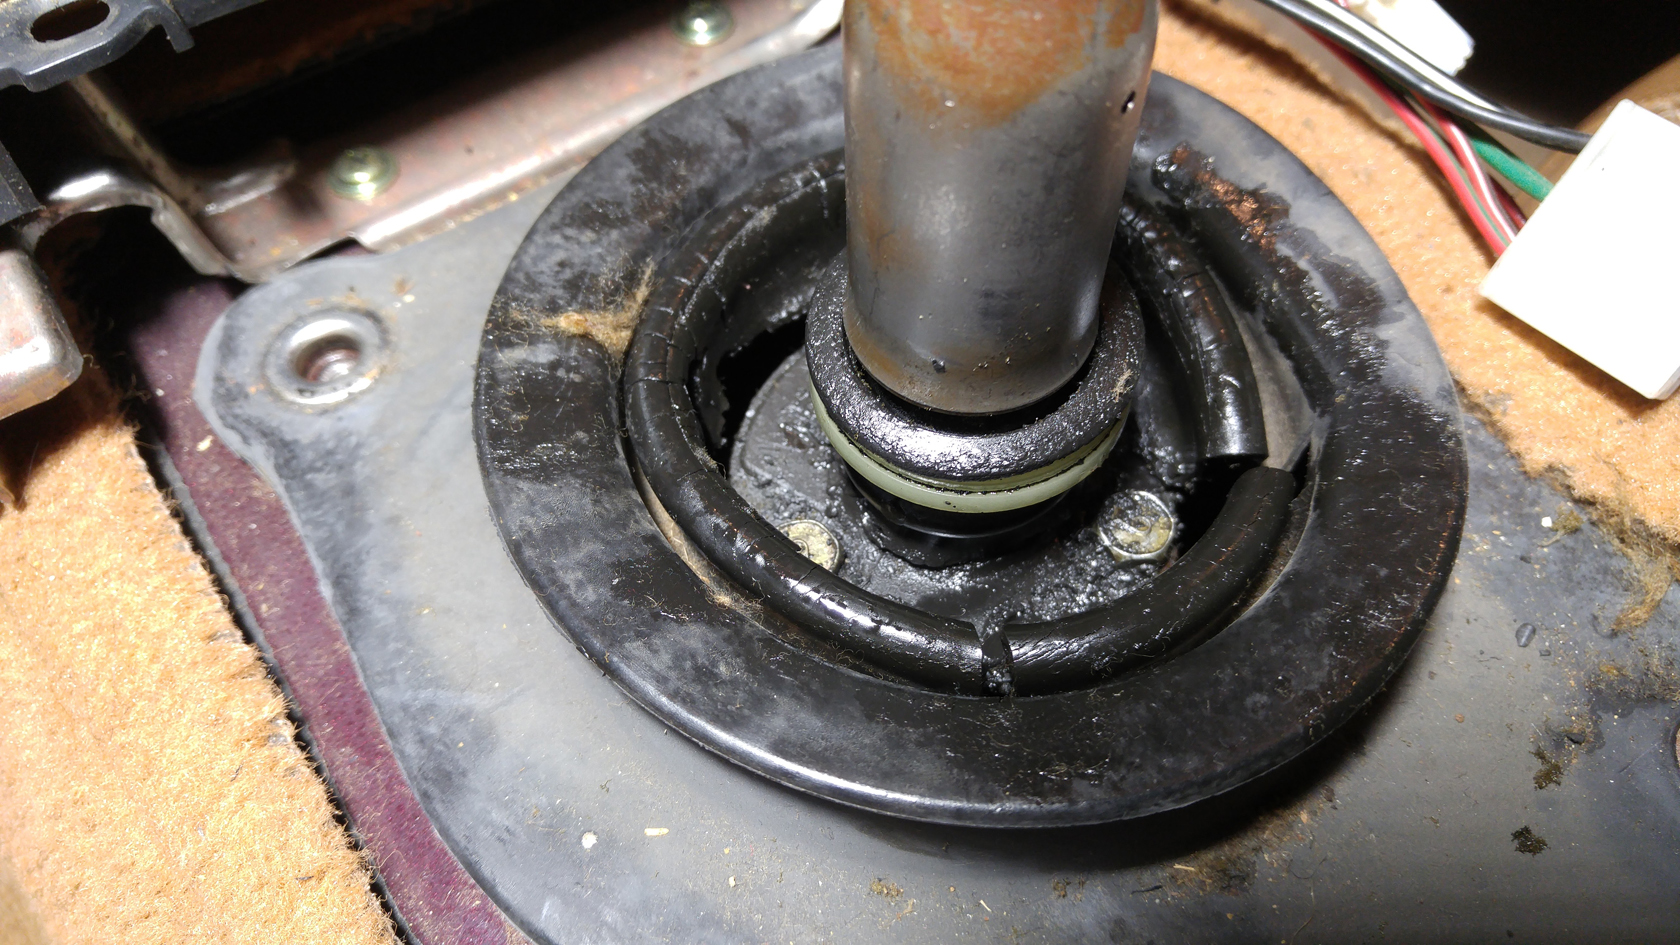
Remove those bolts and carefully lift out the shift lever and everything attached to it.
Here's what it looks like, with torn up bits of rubber, grime, and old yellowed plastics:
Here's what the shift turret looked like, with a worn plastic bushing and some very dirty fluid, plus more grime:

Some may not have any fluid at all!
After you unscrew the four bolts holding down the large boot, you will probably have to pry it up. Remove it completely to better expose the three bolts holding down the small boot below.
Remove those bolts and carefully lift out the shift lever and everything attached to it.
Here's what it looks like, with torn up bits of rubber, grime, and old yellowed plastics:
Here's what the shift turret looked like, with a worn plastic bushing and some very dirty fluid, plus more grime:
Some may not have any fluid at all!
Remove the Lower change bushing P/N Y601-17-492 (The black one). You will need to press the pin back out of the way (do not need to remove) to access the lower change bushing. Use vise grip to push pin, using a socket at the back end helps.
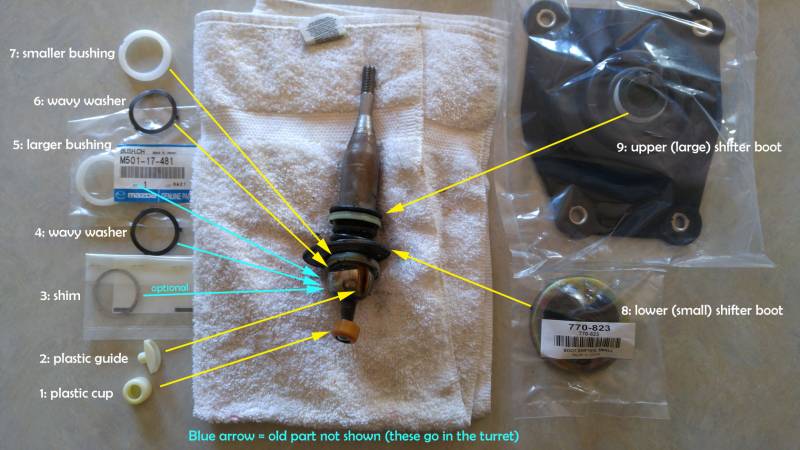
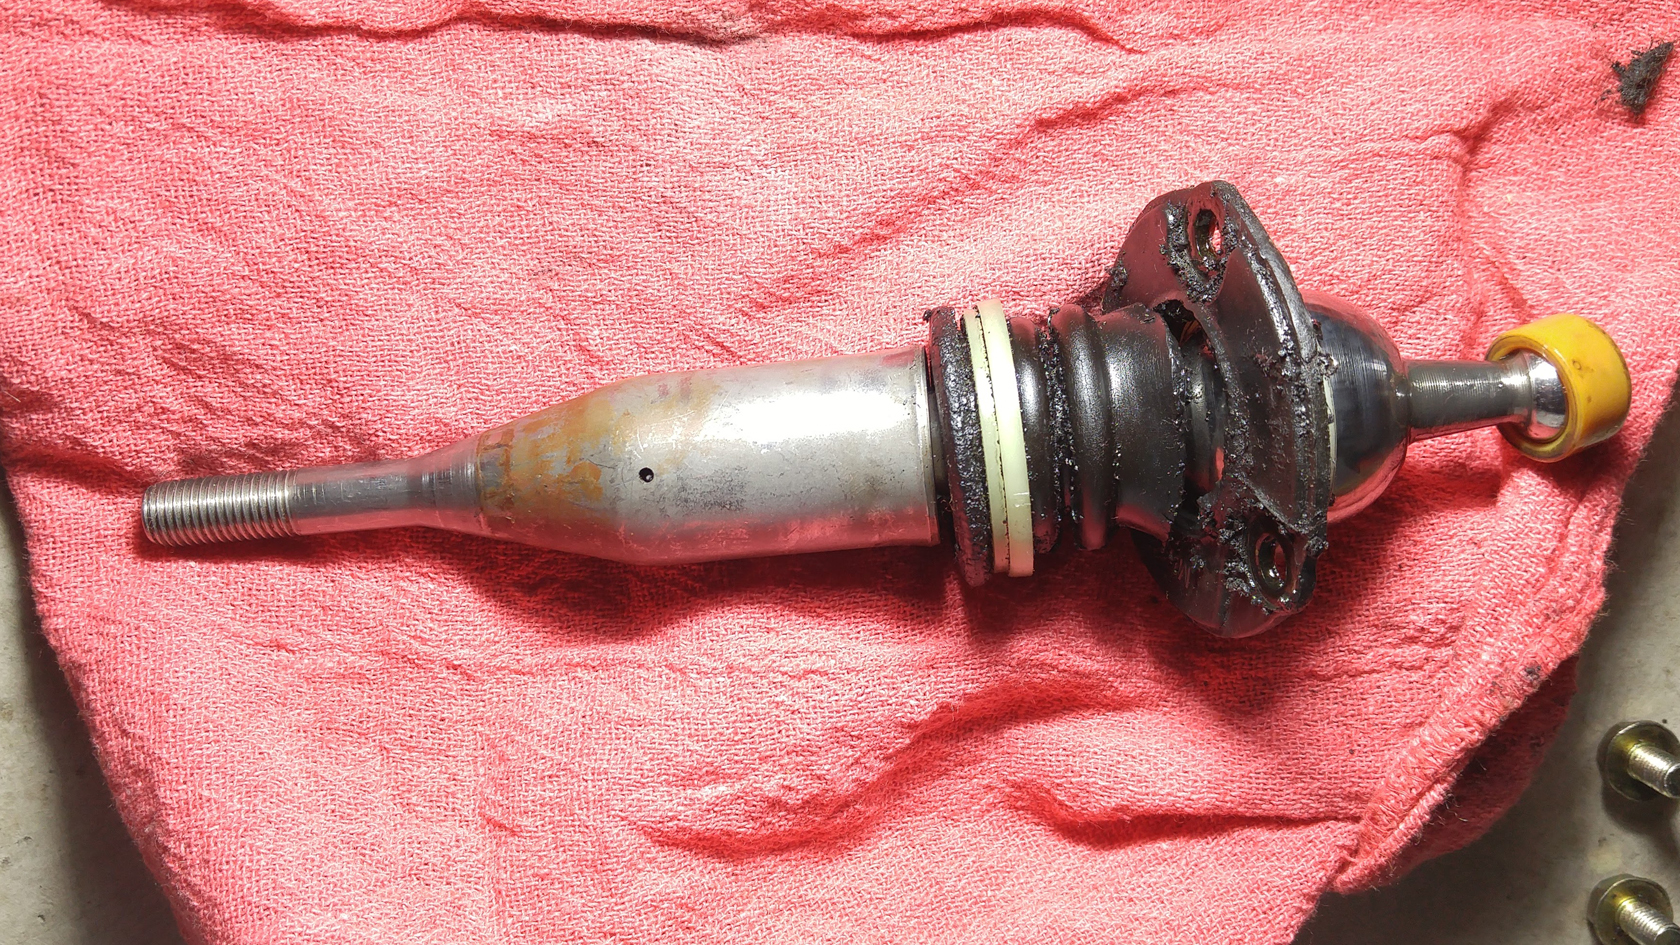
Separate all the loose parts from your shift lever, it should look like this:
The "permanent rubber ring" is at about the midpoint of the lever. That is left alone. Wipe down the lever and clean off all grime, grease, etc. You can now follow the steps to rebuild the stick portion.
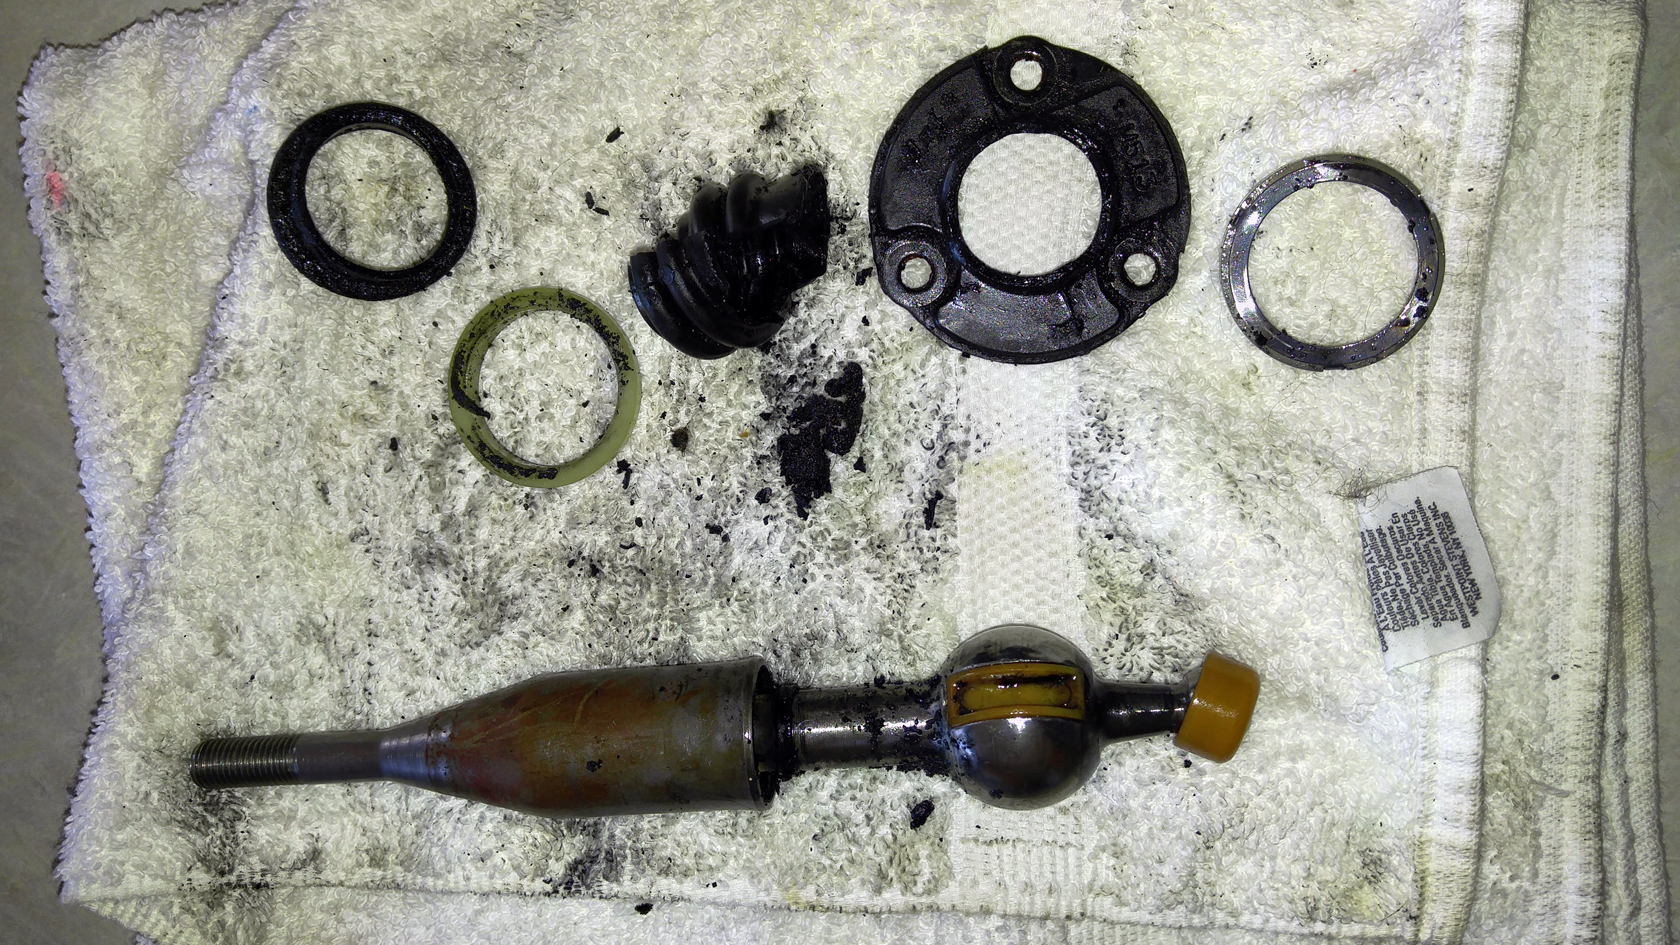
Set out the parts in physical order (bottom to top) as the go in the car when everything is back together. Here is a diagram of that, showing the new parts and which old bits they will be replacing (note, we no longer supply the shim as that part has been proven unnecessary):

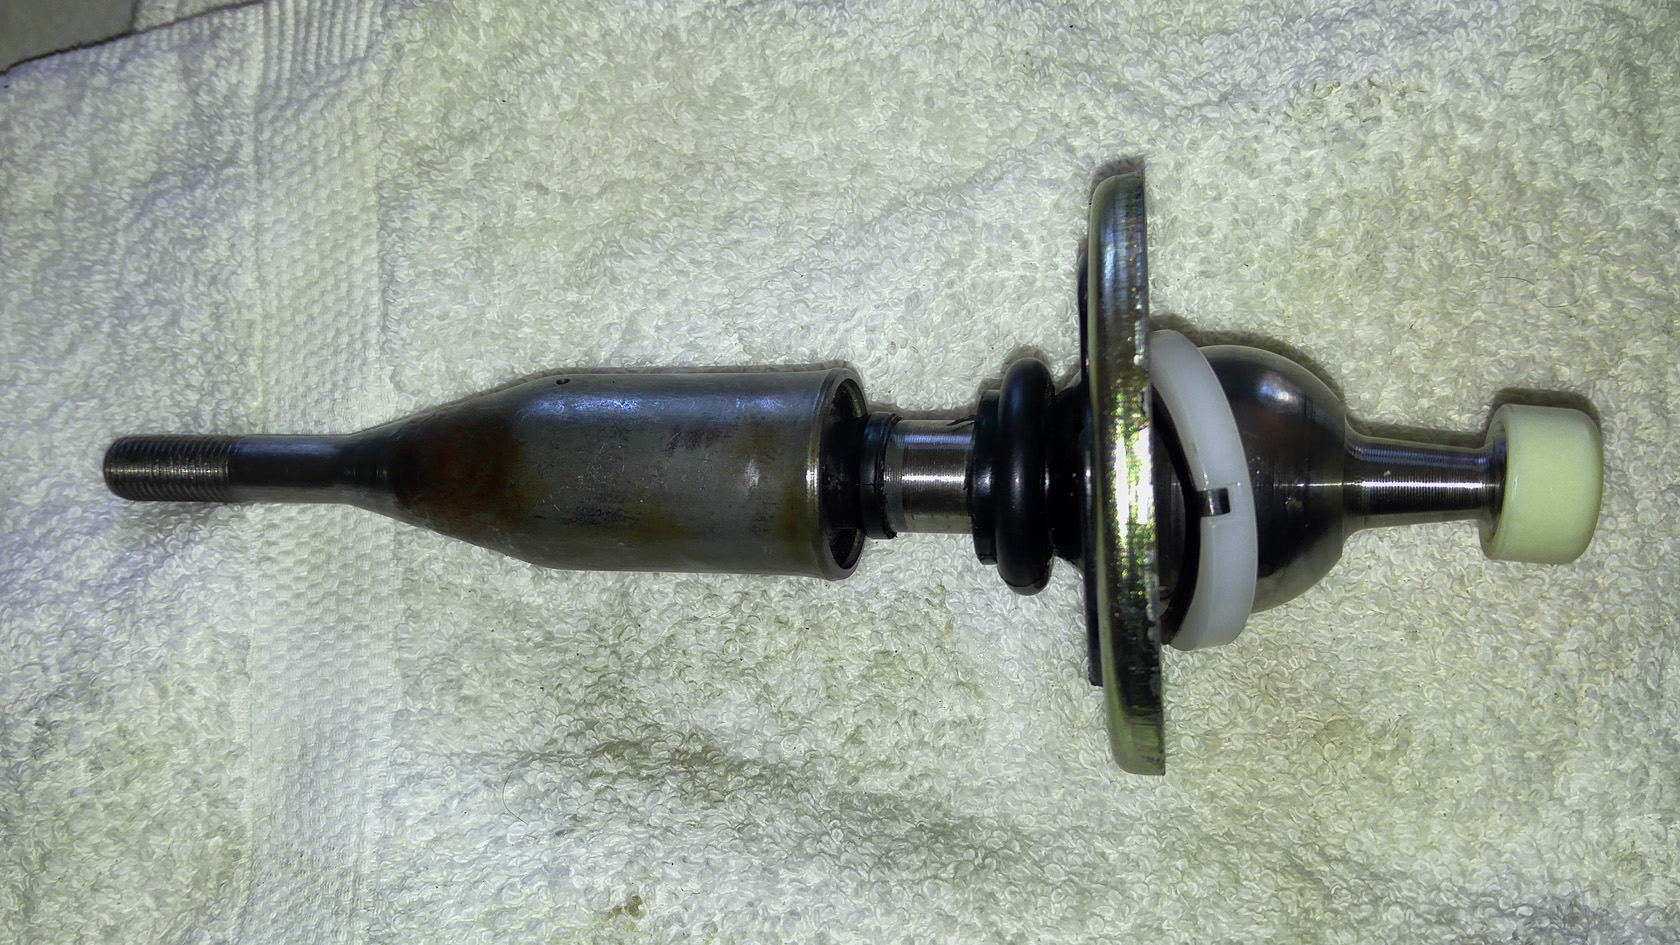
After rebuilding, this is what your rebuilt shift lever should look like:
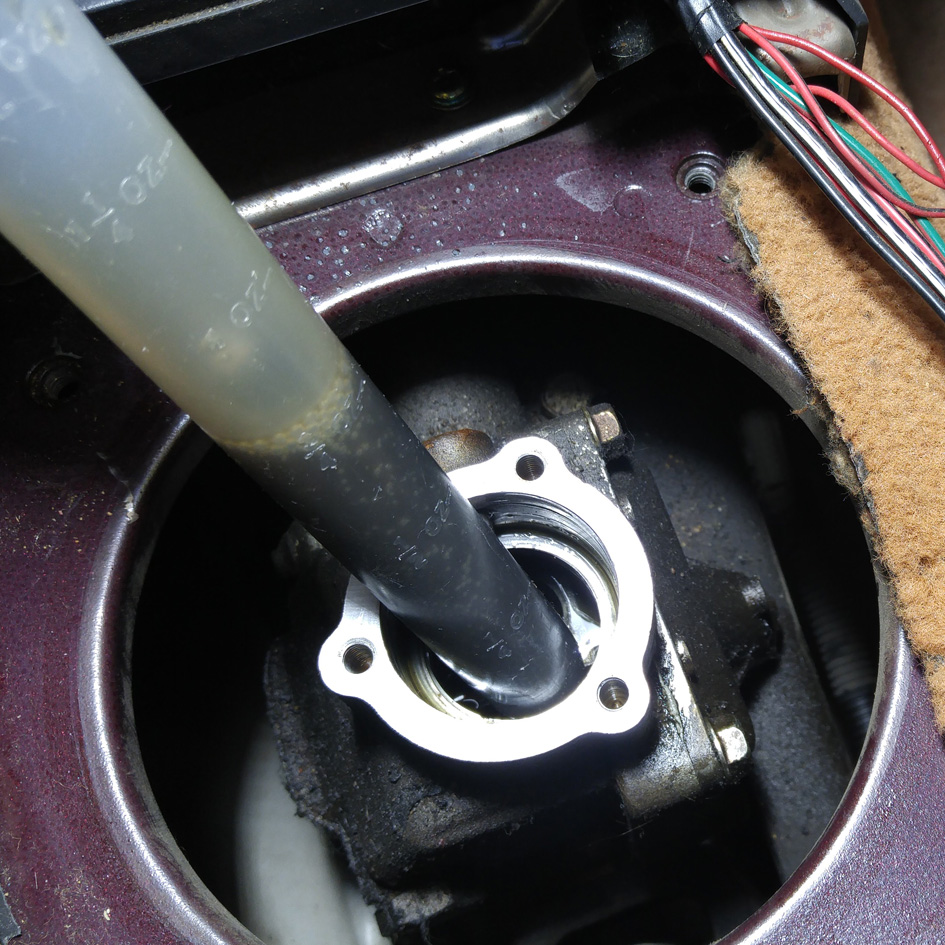
Back to the turret, a kitchen baster works great for sucking old fluid out and depositing it into a container:
Separate all the loose parts from your shift lever, it should look like this:
The "permanent rubber ring" is at about the midpoint of the lever. That is left alone. Wipe down the lever and clean off all grime, grease, etc. You can now follow the steps to rebuild the stick portion.
Set out the parts in physical order (bottom to top) as the go in the car when everything is back together. Here is a diagram of that, showing the new parts and which old bits they will be replacing (note, we no longer supply the shim as that part has been proven unnecessary):
After rebuilding, this is what your rebuilt shift lever should look like:
Back to the turret, a kitchen baster works great for sucking old fluid out and depositing it into a container:
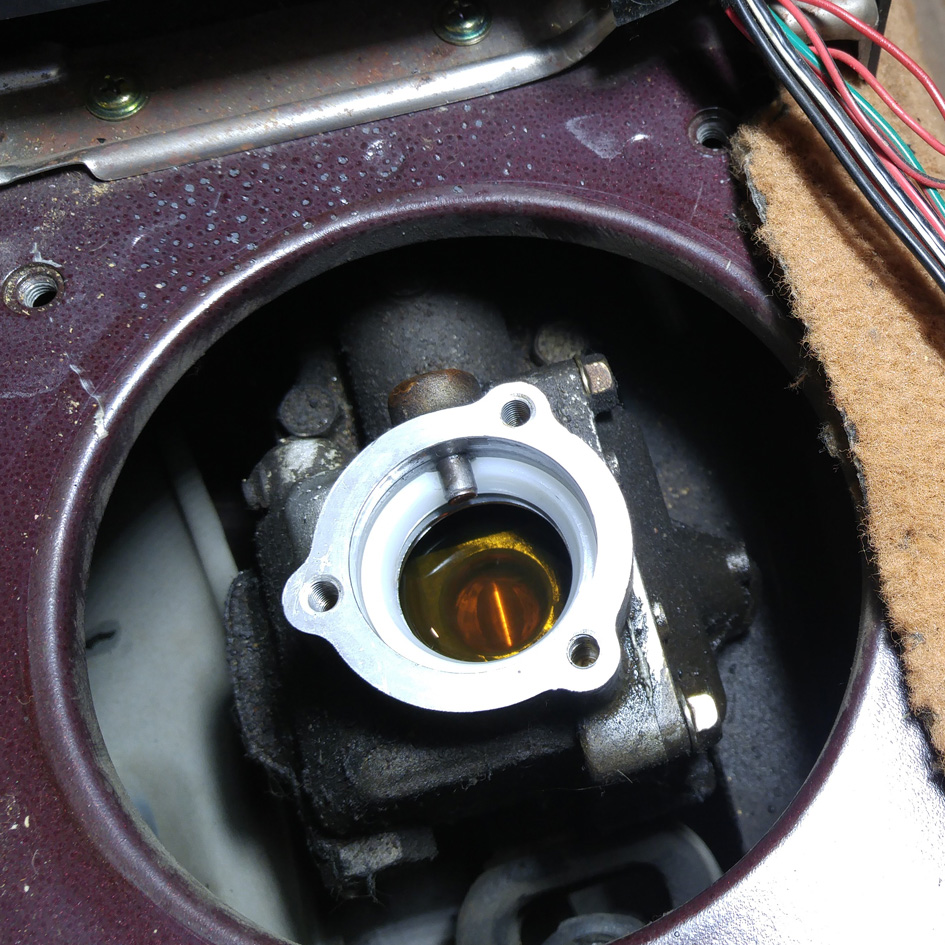
After wiping it out as best you can, replace the fluid. We use Redline gear oil available on the web site.
Here's the turret with new fluid and the larger bushing installed with wavy washer beneath. Note the shim installation is optional. It is a trial and error process of determining its need.
Here's the turret with new fluid and the larger bushing installed with wavy washer beneath. Note the shim installation is optional. It is a trial and error process of determining its need.
All the parts on the lever just push into place, they may require some lube and pressure to install. Reassemble the lever.
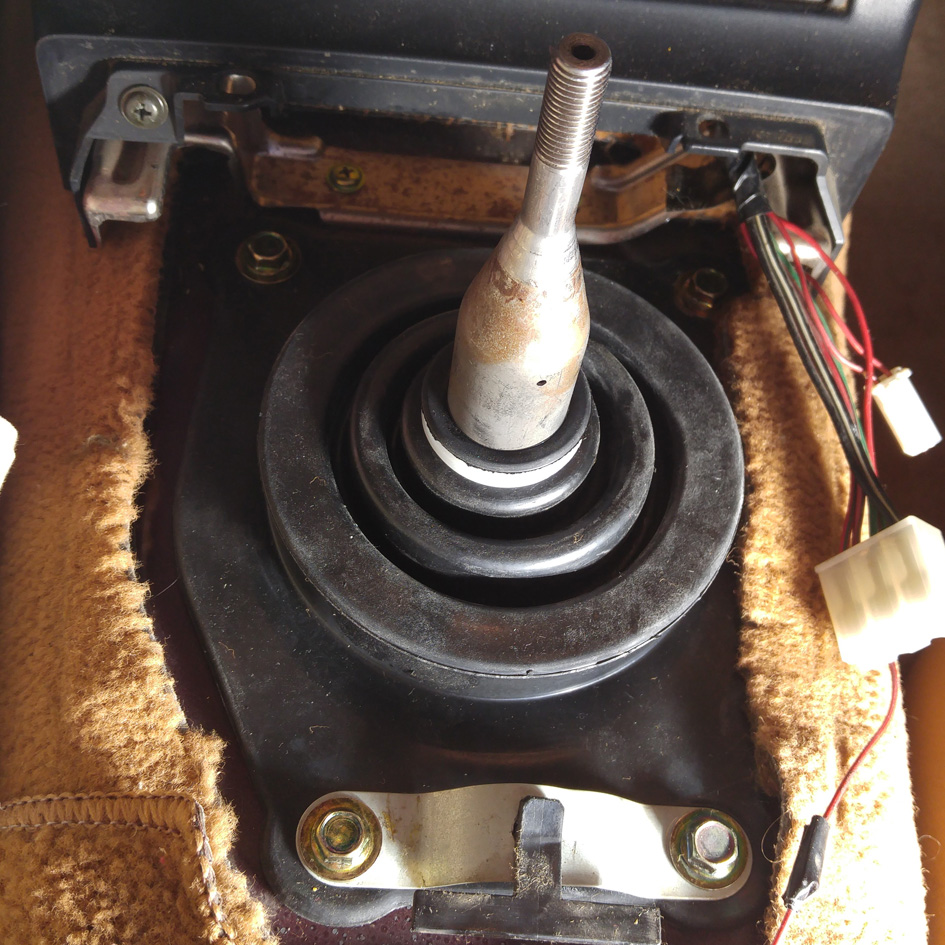
After the small boot with three bolts is tightened down, you install the large boot.
Use some lubricant to help it slide down. But don't slide it all the way past the end of the wide part of the lever. This part seems missing from many instructions. Just slide it down toward the bottom. There is a bit of lip there to keep it from going to far, but you CAN push it too far and it's a pain to pull it back up.
Here's what you should see when you are done:
Remember to replace the insulation parts before you put the console back in!
Details
- 23790515
- TCM-0882
- New
Categories
- New Miata Parts - New Miata Parts '90-'97 - Drivetrain, Transmission, and Differential
- New Miata Parts - New Miata Parts '99-'05 - Drivetrain, Transmission, and Differential
- Performance and Spec Miata Parts - New Spec Miata Parts '90-'97 - Drivetrain, Transmission, and Differential
- Performance and Spec Miata Parts - New Spec Miata Parts '99-'05 - Drivetrain, Transmission, and Differential
Shipping Information
- Item Requires Shipping
- 1.0 lbs.
- W12.0000” x H8.0000” x L1.0000”